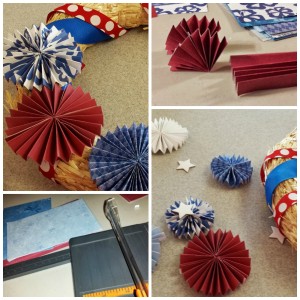
This should come as no surprise but, I am not super crafty. I see all these very cute projects on Pinterest but I have not the time nor the talent to attack them. But my kids love to craft and want to spend time with me so I look for cute projects that they can so with me. I saw something similar to this in an All You magazine (last year, maybe) and I tweaked it to a project that I did with my 2 oldest kids!!!
All you need:
Wreath form (the nicer it is the less you have to cover it)
5-7 pieces of 12×12 scrapbook paper (depending on how many patterns you want)
Chip board stars
Ribbon
Glue sticks or tape runner
Hot Glue gun
Paper cutter
Ruler (optional)
 Process:
Cut the 12×12 sheets in half. Cut 1 half into 4×6 pieces and the other into 3×6 pieces. Then take 3 pieces of matching paper (both in size and pattern) and do a 1/2 inch accordion fold in each one. I give the kids a ruler and a Pampered Chef scraper to use;). You can also use a bone folder to sharpen the folds.
Take 1 piece that has been folded and fold it in half lengthwise so it looks like a fan. Glue it that way with either the glue stick or tape runner. Take 3 matching fans and glue them together to make a rosette. Do this for as many rosettes as you would like.
Wrap your wreath form in ribbon. You can cover it or do like I did so that you can see the form underneath. I didn’t have a lot of the blue ribbon so I used a second for the red and white. Do it how ever you want. I secured the ribbon with straight pins but you could also glue it onto the form.
Take your small rosettes and hot glue your stars onto the centers. You could probably do it last but I find this easier.
Start arranging your rosettes on the form. You can cover it but my kids didn’t want to make that many rosettes;). I made a point to try to randomize the colors and patterns. Then hot glue it all down. Make sure to leave your wreath flat until the glue cools!
Then my daughter wanted a bow on the wreath. So I just took the extra ribbon and tied a bow to her finger and hot glued it on.
Seriously, that is it. The only thing I specifically bought for this project was the wreath form which we can use again. Everything else is crafting extras that I had in my cabinet from various projects I was going to someday do.
And now we have a super cute wreath that the kids got to help make!!!

That is super cute, kind of shabby chic meets bold patriotism I am in Canada, can you design a Canada Day one
Thanks for sharing and linking up at Favorite things Friday! Don’t forget to add a button or link back to be eligible to be featured! I’d love to see you on my blog! Hope to see you again this week!
And I just saw the button, wow, blind today So scrap that part of my comment ha ha