Tag Archives: freezer

Bertolli Meal Soup

We all have those nights that we are going out but need to feed our kids or leave something the sitter can make. But I am kind of picky about frozen food. The kids need to have some vegetables, it needs to taste good, and not be greasy! It also needs to be easy enough that my sitter can make it while chasing my 4 kids;). Another component is wheat;). Since NerdDad and I are both gluten free, the kids kind of look forward to getting something with gluten when they eat dinner without us;).
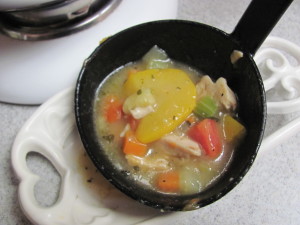
So my kids were stoked to be able to try Bertolli’s Roasted Chicken and Rotini. They felt it was fancy and very grown up! My sitter said that it was easy to make and didn’t take a lot of work. The problem we found is that the younger 3 really wanted more pasta and less veggies but isn’t that how little kids always are? But my sitter and my 10 year old absolutely loved the soup!

I think that this soup is a great meal option! It is better for you than any fast food and probably quicker! Keeping this in your freezer is a pretty smart move! So check out more by visiting Bertolli’s Website, Facebook or follow them on Twitter!

(Disclosure: I was compensated to review Bertolli’s Meal Soups by GigCoin. But while they picked the subject the opinions were all mine!)

Peach, Peach, Peach

I love peach season but once you bring them home they just don’t seem to last all that long. I got some from my friend Bethany’s tree on Monday and decided to make some peach puree to freeze. Why? Well, you can use it to flavor oatmeals, make smoothies and so much more! So how?

First, put a pot of water on to boil. Then, cut an X into the bottom of each peach. Once your water is boiling, drop your peaches in for 1 minute.

Then pull your peaches out and plunge them into an ice bath. An ice bath is literally a bowl of water and ice. You put the fruit into it in order to stop the cooking. This is a technique called “Shocking”. The peaches only need to be in there a little bit until they are cool to the touch. Then so to your slit in the bottom and use a knife to peel them! Chunk them up and put them in a bowl. I added a little honey because these are just a touch tart and the kids would prefer it sweeter in oatmeal.

Then take a stick blender to it and blend away! I took the puree and put it into an ice cube tray. Then I popped it into the freezer. Tomorrow I will put them into a zipper bag and take them out as needed.

This is super easy and a great way to extend the season! You can use this technique for just about any fruit!

So what all would you use fruit purees in?

How I Made 5 Trays of Enchiladas in 2 Hours

I do bulk cooking but not in the once of month method. I don’t make 30 days worth of food in 2 days. Instead I take an ingredient and then make a lot with it. This time it was chicken breasts. I assembled 5 trays in less than 2 hours.

Now to be honest I didn’t cook the meat in that time. I had dump a bunch of boneless skinless chicken breasts into the crockpot and turned it on low to cook over night. Then (while I was at a baby shower) my husband gave my 6 year old a big bowl, the meat and 2 forks. She went to town and shredded it all. Then he put it into gallon bags for me.
So today I assembled all my ingredients. Enchilada sauce, tomato sauce, corn, spinach, shredded cheese, and tortillas. I thawed the spinach under hot water and squeezed all the water out. In the big metal bowl I mixed up the spinach, corn, meat, cheese, some tomato sauce and enchilada sauce. The tomato sauce keeps it from being to spicy for the kids. Then I rolled! You know the process… put sauce in the bottom of your baking pan, then dip the tortillas in sauce, then put some filling in and roll! The key is to have everything lined up and ready to go. I use up the enchilada sauce then I just grab the next can sitting on the counter.
So for those of you who think they don’t have time for bulk cooking just remember that in about 2 hours I fully assembled these, made my kids pb & j sandwiches, tended to them during lunch, washed up and changed the baby, and did all my clean up! If I can do it so can you!

(I included this post in Cooking for a Crowd at Raising Olives)

Burritos: The Delightful Leftover

I know, I know, burritos aren’t glamorous but they are yummy and cheap! I made about a pound of pinto beans in my crockpot and a few cups of rice in my rice maker to go with enchiladas one night. The I take the leftover beans, throw them in a pan with a touch of oil, minced garlic, salt and pepper. Then I take an immersion blender to them and Voila! Refried Beans!

Then get tortillas from the bread store ($2 for 30), shredded cheese, and taco sauce in a squeeze bottle (50 cents for 1 from the Dollar Store). Make an assembly line with these, the beans, the rice and either a saute pan or griddle (to heat the tortillas to make them bendable).
Then assemble! To fold the burritos first fold the edge in, then the 2 sides like a present. Then continue to roll. All my kids eat these and they don’t leak! But don’t over stuff!
That is it! You can even make a ton and freeze them!

Freezer Cooking Update!!!

After finishing up the Pantry and Freezer challenge in January my freezer was literally empty. After throwing away copious amounts of meat I decided that I needed to be more stream line in what goes into my freezer. I also am now keeping a log of everything in it too so nothing gets lost or forgotten.

To fill our freezers many bloggers (me included) did some bulk cooking. My cooking spanned over 3 or 4 days and this is what I ended with.
4 trays of Pasta Bakes with Turkey (one with Broccoli and 3 with spinach)
2 trays of Pork Enchiladas
8 packages of cooked chicken
3 packages of shredded zucchini to be used in Zucchini Corn Cakes
So how is that for a weekly Tackle;)?

Freezer Cooking Update


Check out my nearly empty freezer! After doing the freezer and pantry challenge in January we have an empty, defrosted freezer! So today I joined in with Life as Mom and Money Saving Mom (and countless others) in a Freezer Cooking frenzy. This was a change from how I normally do my freezer cooking. Usually I only do 1 thing a day. Well, today I bit off more than I had energy for;). All because I wanted to play in the big leagues;).

So what did I get made?
2 Loaves of Zucchini Carrot bread (made 1 batch of muffins as 1 loaf)
3 batches of Broccoli Mac and Cheese gratin (each batch made 2 8×8 or round dishes) with 1/3 of the broccoli substituted with cauliflower
1 batch of Broccoli Mac and Cheese with Turkey and a handful of shredded carrot
1 batch of Easy Pasta Bake with Turkey and a handful of shredded carrot
It may not be all I hoped but it is a goodly amount of food to cook between 11-6;). Now I have zucchini grated along with Carrot in order to make a few more batches of bread. I am also going to make baked chicken to cube up and freeze for future meals. I also cooked a pork roast today in the crockpot that will make delish enchiladas!

Super Easy Pasta Bake

This is one of my big make ahead dishes. I always make it when I need to feed a crowd easy and for cheap! I buy the chicken breasts in bulk and cook them all up one day. Then I buy pasta in bulk and frozen spinach at Winco and the big bag of shredded mozzerella cheese from Costco. I stash pasta sauce in the pantry when it is on sale. I buy the disposable aluminum foil dishes from the dollar store (or the big pack at Costco from Christmas time). Then I make them up about 6 in just about 3 hours! I find they cost less than $10 to feed 8-10 people.

Ingredients:
1 lb (or 2 cups) cooked, cubed, boneless, skinless chicken breasts
1 package frozen, chopped spinach: thawed and throughly drained
1 jar of pasta sauce
1 lb of pasta: cooked and drained
Mozzarella to top generously
Process:
To cook the chicken I put it on a baking sheet. Season it, put water in the bottom of the sheet and cover with foil. Then cook at 350 degrees for a half an hour. Let the chicken cool enough to handle and cube.
Then mix all the ingredients together except cheese. Then place in the baking dish. Top with cheese. This is the point you can cover tightly with foil and place in the freezer. To cook (thawed) just place it in a 350 degree oven for 1 hour. Make sure the cheese is throughly melted.
That is it!!! A yummy, hot, homey meal that can just live in your freezer.

WFMW: Backwards Day

As the new year is about to start I , like everyone else, am looking at changes I want to make. Believe it or not it isn’t to eat healthy. My change I want to make is to do more “once a month”, freezer style cooking. So that leads me to my question for this backwards Works for Me Wednesday.
Do you have any recipes that are good in the freezer or any once a month cooking tips?

Super Easy Home Made Chicken Stock

Ahh, the elusive home made chicken stock. But I don’t want to collect bones in my freezer or watch the pot for hours upon hours. So is there an easier way? Definitely! Now it may not be quite as good as one made with chicken feet and simmered for days but then again, neither are the cans. I use dark meat on bones to make my stock and then I use the meat for chicken pot pies and other meals.

Ingredients:
3 lbs dark chicken meat, on the bone but skinless
2 ribs of celery chopped (optional, NerdDad doesn’t like the taste of celery so I don’t use it)
1 onion chopped
2 carrots chopped
2 heaping teaspoons minced garlic
A few stalks of herbage (pick 1 kind, I often use parsley)
Water to cover
2 teaspoons of oil
Process:
Heat stock pot on medium heat, place oil in the bottom. Dump in celery, onion, and carrots and sweat. When the carrots just start to get a little soft around the edges add the garlic. Continue to cook until you can smell the garlic. Then drop in the meat and cover with water. Bring it to a boil and then reduce to a simmer. Continue on a simmer for 30 minutes. Then remove the chicken and do as you wish with it. Then strain all the liquid and discard the solids. Then you have cups and cups of beautiful stock. It freezes beautifully!
(Check out more wonderful things at WFMW!)