Tag Archives: side

Gluten Free Cauliflower Puffs

I love cauliflower but the rest of my family are not such fans. But I was thinking about how people often use cauliflower in things like mash as a substitute for potatoes…So I was thinking about how much I miss things like tater tots because I am not sure what it in them so I decided to try something new!

Cauliflower puffs! I wouldn’t say they are healthy but I do think they are a very reasonable alternative to french fries and tater tots! Pretty easy too.

Ingredients:

1 1/2 heads of cauliflower florets, microwaved with garlic salt until tender
1 1/2 cups shredded cheese
1/4 cup sour cream
1 1/2 cups gluten free flour blend
1/4 tsp paprika
4 tablespoons real bacon bits (or cut up bacon)
1 tablespoon dehydrated onion

Process:

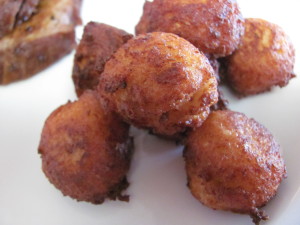
Cut the florets off the heads of cauliflower. I cut them into to small pieces so they cook quickly, you are going to mash them up anyway. Season it well with garlic salt and microwave them. Then take a mash potato masher or a stick blended to the cauliflower. Don’t puree the cauliflower but leave it with a little texture. Then mix everything else in! Heat up your frying oil to medium. Drop the batter into the oil by the tablespoon full (the smallest scoop that Pampered Chef makes;). Let it cook until it is all golden brown and delicious!

I tried to make them larger about cookie scoop size but they tend to be doughy in the middle. Making them smaller helps them to be crispy and delicious!!!!

This are a huge hit with the whole family and go great with burgers.
Gluten Free Spinach Fritters

Ok I admit it, I am bored to death of rice and potatoes. I needed a new side dish. One of my favorites were fritters before we went gluten free. So I started thinking, why not figure out a gluten free fritter recipe?

I went with spinach because then I wouldn’t need as much breading. This was pretty easy and came together super quick. I think it is decently healthy. Next time we will have to make a double batch. While it is plenty for a family of 4 for a family of 6…my kids would have had more.

Ingredients:

1 10 ounce box of chopped spinach, thawed and drained
2 eggs, beaten
1 1/4 tsp salt
1/4 tsp paprika
1/8 tsp pepper
2/3 cup shredded cheese
2/3 my gluten free flour blend

Process:

Mix all the ingredients together. Then fry tablespoon sized dollops in a skillet with a moderate veil of oil. Fry on both sides until it is crispy. Drain it on some paper towel (there isn’t much oil). And devour! That is it!!!

Grilled Corn 2 Ways

Corn is king! Well, at least during the summer. You can pretend it is a veggie or serve it as the grain it is. It is fresh, it is cheap and it is yummy! So why should you heat up your kitchen by boiling water when the grill is already on?

You have a couple of options when it comes to grilling your corn.

The first way is to grill it in the husk. This gives you more of a boiled taste that isn’t at all smoky. The process is quite simple. Pull back your husks and remove all the silks or they will burn and turn to ash. Then I brush some of my chili butter on it and pull the husks back up. Then I place it on the cool part (on low) for 15 to 20 minutes. Turning occasionally. Then just pull it off and brush more butter on them.

The second way gives you more of that charred grilled taste. I think it gives more flavor but NerdDad prefers the first way;). First you pull everything off the cobs, that means all the silks and the husks. Then throw it down on a medium high grill. Make sure you keep turning the cobs and monitor the color. You want some grill marks but if it has good color and isn’t fully cooked, just pull it to a cool spot on the grill and let it finish. This usually takes me10-15 minutes but closer to 10. Then when you pull it off brush with butter;).

How do you know if your corn is done? Well, with yellow corn it is easy because the kernels deepen greatly in color. But while will also change color a little. But one of the other indicators is that the kernel will plump and become softer. If you have had corn before just go for what you know;).

Leftovers are great in many recipes and also do great in the freezer. I would go ahead and cut the kernels off the cob for storage. Enjoy!

Fried Zucchini

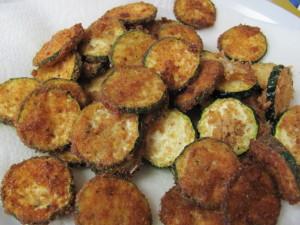
Yummy Fried ZucchiniFried Zucchini is a super easy and very yummy too! It is a great way to get your kids to eat more veggies. This, like many of my recipes, is more process than recipe.

Basic Ingredients:

Egg and milk: eggs lightly scrambled with just a splash of milk, I like to lightly salt and pepper this mixture too.

So seasoned bread crumbs are a must! While I am a huge panko bread crumb fan, this is not the right application for in it (at least not for me).

Zucchini cut into rounds. Yes, I am aware that a lot of people cut their zucchini in wedges but… I find that the kids can handle it better. From a cooking stand point, you are less likely to over cook the outside with rounds. You tend to have to cook thick wedges a bit longer to make sure that they are cooked all the way through.

Cooking oil: pick a low/no flavor oil like canola

Process:

First, wash and thoroughly dry your zucchini. Then cut it into rounds between 1/4 to 1/2 of an inch, depending on how cooked you like your zucchini (my kids don’t want any crisp;). Then drag your rounds through your egg and milk mixture. Then plop them right into your seasoned bread crumbs. You can see if your oil is hot enough by dropping a couple of bread crumbs and if they sizzle you are ready! Then drop your breaded rounds in your oil that is heated to medium high. Make sure that you flip them over and cook them until they are GBD (golden brown and delicious)! Then you will take the zucchini out and place it on a paper towel to dry, sprinkle with a little salt (I use sea salt) and sit for a couple of minutes. You do not want to eat these seconds out of the oil, you will burn yourself with steam!

Then enjoy!

(I listed this in Beauty and Bedlam’s Tasty Tuesday!)

Zucchini Corn Cakes

Who doesn’t want a yummy way to get veggies into your diet? I need to get more serving myself not to mention teaching my kids to eat and like them. I saw a recipe for these in a magazine and tweaked it a little bit.

Zucchini Corn Cakes
Ingredients:
1 box of Jiffy cornbread mix
1 cup of shredded zucchini, microwaved and drained or frozen and drained
1/2 cup + splash of milk
1 egg
1/8 tsp of pepper
Procedure:
Mix all the ingredients together. Let sit for 3-5 minutes. Then fry up like pancakes with a touch of oil. You can fry it in more oil and it is delicious but not as good for you.
How easy is that?!?!

Food Tip: Mashed Potatoes

I love (and the NerdFamily does too!) mashed potatoes but I hate peeling them. I have a new secret weapon in easy and quick mashed potatoes, Food Mill! Just wash and cube your potatoes, skin and all. Then when they are done you dump them into the mill and turn the handle. You will get velvetey mashed potatoes and all the skins will be left behind. Now you may get little flecks of skin (depending on what variety of potato you are using) but it looks fine and tastes great.

One more tip on great mashed potatoes? Salt the water you boil the potatoes in. That is right, just salt it heavily just like you do to pasta!

Freezer Friday:Broccoli Mac and Cheese

Welcome to Freezer Friday. The goal here is to make our lives easier. Due to the fact I have 4 little ones and homeschool, I need all the help I can find. Simply post a recipe that can be made, frozen and then later reheated(thawed, etc) and consumed. Make sure that you include freezing and reheating instructions in your post. Then come here and add you post (not your blog) into Mr. Linky.
Now for some disclaimers:
If it isn’t a recipe, I will delete it.
If it can’t be made ahead, I will delete it.
If you don’t have a family friendly site, I will delete it.
Now onto the food fun!

Broccoli Mac and Cheese Gratin

This is an adapted recipe from Cooking Light. I like to double and even triple this recipe. The key is to not to crowd your boiling water.

Ingredients

1 pound of uncooked medium seashell pasta
6 cups broccoli florets (about 1 pound)
1 tablespoon olive oil, divided
2 garlic cloves, minced
3 3/4 cups 1% low-fat milk or 2% milk, divided
1/3 cup all-purpose flour (about 1 1/2 ounces)
1 cup (4 ounces) shredded fontina cheese
1/2 cup (2 ounces) grated Asiago cheese (Parmesan will do)
1 1/4 teaspoons salt
1/4 teaspoon freshly ground black pepper
Dash of ground nutmeg
Cooking spray
2 (1-ounce) slices white bread or 1/4 cup preseasoned bread crumbs or panko crumbs

Preparation

Preheat oven to 400°.

Cook pasta in boiling water 8 minutes; add broccoli. Cook 3 minutes or until pasta is done. Drain.

Heat 2 teaspoons oil in a Dutch oven over medium heat. Add garlic to pan; cook 45 seconds. Transfer garlic mixture to a small bowl; set aside.

Add remaining 1 teaspoon oil to pan; stir in onion. Cook 1 minute, stirring frequently. Remove from heat; stir in 3 cups milk. Lightly spoon flour into a dry measuring cup; level with a knife. Combine the remaining 3/4 cup milk and flour in a small bowl, stirring with a whisk. Add flour mixture to onion mixture. Return pan to medium-high heat, stirring constantly with a whisk; bring to a boil. Cook 1 minute or until thick, stirring constantly with a whisk. Remove from heat; stir in the cheeses, salt, black pepper, red pepper, and nutmeg. Add pasta mixture to milk mixture, tossing gently to coat. Pour mixture into a 13 x 9-inch baking dish (or 2 8×8) coated with cooking spray.

Combine garlic mixture and bread in a food processor; pulse 15 times or until fine crumbs measure 1 cup. Sprinkle breadcrumb mixture over pasta mixture. Bake at 400° for 18 minutes or until the top is brown.

Makes 8 very generous servings

To Freeze: I freeze it before baking in 8×8 baking dishes, covered well in aluminum foil. Then I cook defrosted for 1/2 hour or frozen 1 hour.

Technorati Tags: zucchini, Freezer Friday, Make Ahead

Asparagus – Quick and Easy

When I got married I realized that there were many elaborate recipes containing vegetables but there were very few sources to tell me how to just cook it. One of my favorite veggies is asparagus but I don’t want it just boiled. That is a promise that all the flavor and vitamins will be in the water not in the asparagus. So here are 2 easy ways. In prep for both, bend 1 spear of the asparagus until it naturally breaks. Depending on when in the season you are is how much of the end needs to go. So this gives you the perfect indicator. Then cut the rest to match. Then toss the asparagus in the oil of your choice (olive has the best flavor) and salt, pepper and garlic salt.
The Indoor Method:
Set your oven to 400 degrees. Put your prepared asparagus on a jelly roll or sheet pan. Roast it for 15 to 20 minutes.
The Grill:
I have a little rack that is made to warm buns. I put my asparagus there and cook it for 10 minutes. Make sure you turn it so it cooks evenly.

All times are approximate. When the asparagus starts to go a little limp, it is done. Eat it by itself or add it to rice or salads!

Technorati Tags: asparagus